Installation
This pages tells you everything you need to know to install the openaltimeter in your models. In general there are three steps that need to be carried out: 1) connect the appropriate leads to the board; 2) configure the board firmware to match the battery that you're using; 3) install in the model. There are two standard configurations that you can use the board in and these are dealt with separately below.
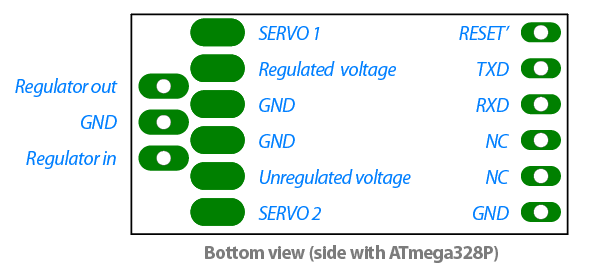
Board connections
The following image shows what the various connection pads on the board are for. Don't worry if they don't all make sense at the moment - it's not really necessary to worry about all the details to get the thing working.
One thing to watch out for when connecting is that the board is not reverse-polarity protected. Be absolutely sure that you're connecting the positive and negative terminals the right way around. Failure to observe this will result in the magic smoke being released from the unit!
They say a picture speaks a thousand words, so this video must be worth a million!
Installation with NiMH/external regulator
If you're using a receiver pack that doesn't need voltage regulation, like a NiMH pack, or you're using a separate voltage regulator then you don't need to use the openaltimeter's regulator function. The low-voltage alarm will still work with unregulated packs, but obviously it can't help you if you have a separate regulator (because it only measures the regulated voltage). To use the board without regulator function you should connect it as shown below.
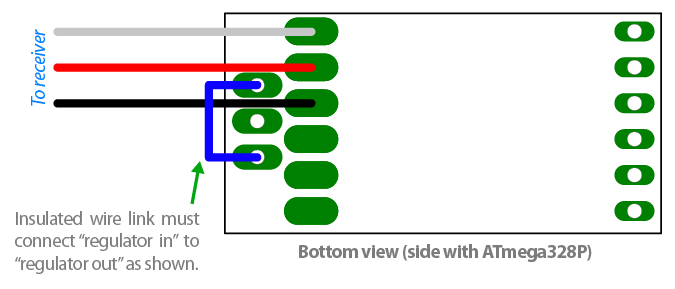
The board takes its power from the radio in this case. Notice that you need to add a wire link that goes where the regulator would otherwise go. Be sure to use insulated wire for this link, as if this shorts out to ground, it's game over! You should also be very careful that none of the servo lead wires can short to the regulator connection pads. I use a small ring of heatshrink around the board to isolate the regulator pads, installed after the wire link but before the servo lead is connected.
Installation with built-in regulator
The other connection option is to use the openaltimeter board as a voltage regulator. This is most useful when used with LiPo battery packs. In this case you need to make three sets of connections, as shown below.
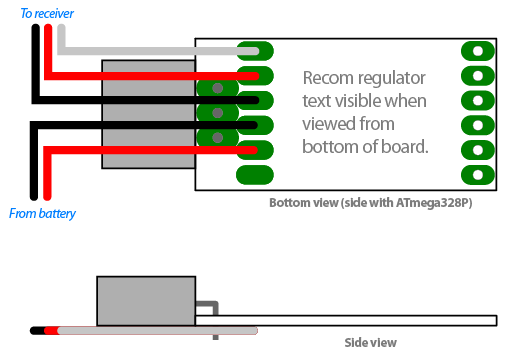
First, you'll want to connect the regulator itself. I always then apply a thin ring of heatshrink to completely isolate the regulator terminals (see the video for details). After this you need to connect a servo lead, which takes the power to the radio system, and a lead to connect the system to the battery. Even more so than above, you should be very careful about avoiding short-circuits. LiPo packs can quite quickly start things smoking if you're not careful! I always check for shorts with a multimeter before connecting anything to the juice.
Setting up the altimeter
Once you've made the connections to the altimeter you can configure it for use. This is done with the "downloader" app which you can get from the downloads page. You should connect up the altimeter to the serial port dongle, following the instructions on the instructions page. Once you're plugged in, then open the downloader app, and update the firmware to the latest version. You do this by selecting the serial port that corresponds to the dongle (again, details on the instructions page) and running the "Flash firmware ..." function in the downloader's "Altimeter" menu. This will make sure the altimeter has the latest, greatest firmware on it, and will bring up a settings box where you can set up the logging rate, low voltage alarm, switch configuration etc.
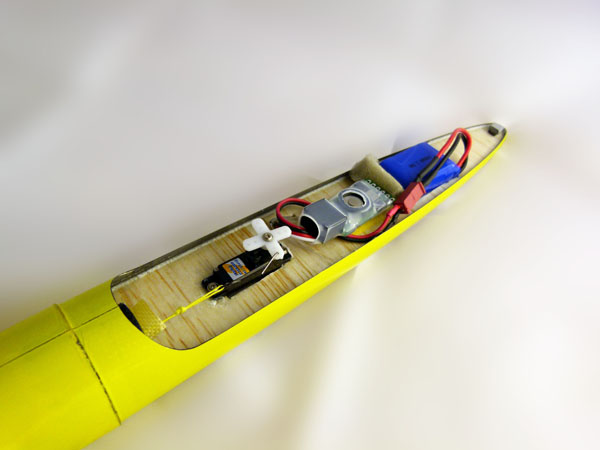
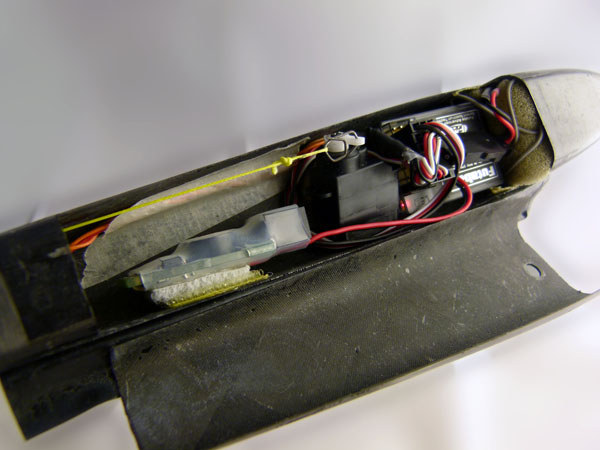
Installing in the model
To take advantage of the at-the-field height readout, and the lost-model-alarm functions you need to connect the openaltimeter to a spare channel on your receiver. This channel should be controlled by a three-position switch on your transmitter. How you install it in your model is up to you, but here are a few photos that might provide inspiration.