Instructions for use
This page describes how to use the openaltimeter. It assumes that you're using a non-modified build of the firmware and downloader. These instructions are current for downloader version V2.1, which comes with firmware version V8.
At the field
When you power up the openaltimeter, after a couple of seconds during which it scans it's memory and sets the base pressure, it will sound its startup tune. If you've got it set up as a LiPo low-voltage alarm it will also beep out the number of cells in the pack - make sure this agrees with what you think! As soon as the beeping stops the unit will automatically start logging. If you just want to use the unit as a logging altimeter then there's nothing else to do.
If you've connected the unit to a three-position switch then you can utilise the various readout functions. When you set the altimeter up, in the settings dialog of the downloader you can choose what function to assign to each switch position. Perhaps the most useful setting is assigning launch height to the mid-position, and maximum height to the on position. Flicking the switch to the configured position will start the readout. As soon as the unit starts beeping you can flick the switch back. The heights and voltage will be read out as a series of beeps, with pauses between the digits: beep-pause-beep-beep-pause-beep would correspond to 121 for instance. It's easy once you get the hang of counting the beeps! The digit zero is outputted as a short double-beep. You'll know it when you hear it.
Connecting your computer to the openaltimeter
In order to read off the logged data, or update the firmware, you'll need to connect the openaltimeter to your computer. To do this you'll need a serial-usb dongle. Any dongle that supports 3.3V level TTL serial and DTR-reset will be fine (i.e. fully arduino compatible, including auto-reset), but I recommend this one from SparkFun which is tested and works well.
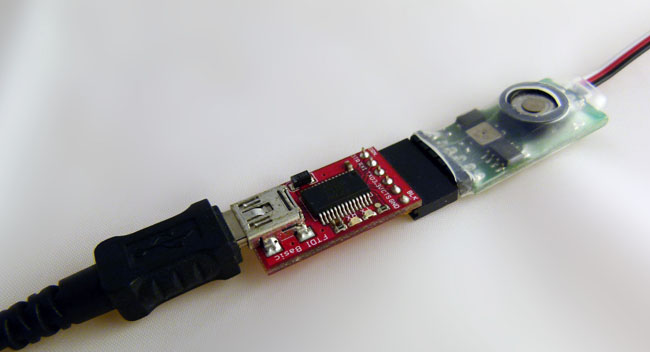
First of all, connect the downloading-dongle to a free USB port on your computer. If possible, try and note which serial port number has been assigned to the adaptor (on Windows, this will look something like COM7). The dongle connects to the board such that, if you're looking at the side of the board with the sounder on, and the pins are sticking out towards the right, then the GND pin of the dongle should be at the top, and the DTR pin at the bottom. I don't think it does any harm if you connect it backwards, but I can't suggest doing it. The picture below shows the dongle connected correctly.
The board isn't powered by the dongle, so you need to power it in the way you usually would. It doesn't matter whether you connect the dongle or the power first, but connecting the dongle first will avoid sending spurious commands to the board so is recommended.
Using the desktop downloader
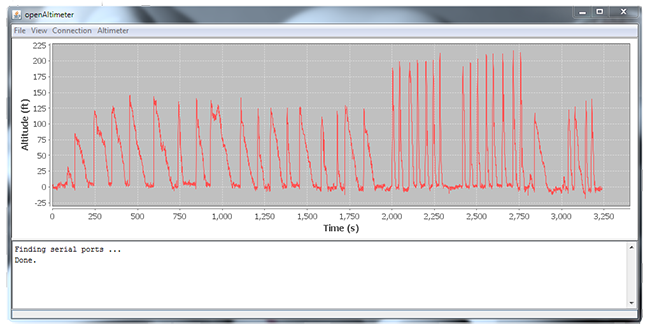
The easiest way to download, view, and save the data, update the firmware, and edit the settings is with the desktop downloader application. You can get the latest version from the downloads page. I won't provide full instructions here but will mention a few important points. The basic gist is to run the program (after connecting the serial dongle), select the correct serial port and select connect. From here you can download the data, which you can save the data for posterity if you like. You can also erase the logger ready for the next flying session, change the settings of the logger (like the low-voltage alarm or logging rate), and update the firmware. One thing to note is that the firmware update should work even if you've corrupted the firmware, so you can always use the downloader to recover your logger if you've messed up experimenting with custom code. The program is pretty self-explanatory so you're probably best just downloading it and playing around.
Using the command interface (advanced, optional)
Alternatively, you can talk to the board directly by sending serial commands to it. You can use any serial terminal program to do this, but I find that the "serial monitor" built in to the Arduino IDE is the easiest to use. You need to tell Arduino which serial port the board is connected to in the "Tools : Serial Port" menu: this should be the serial port number that you noted down when you connected the dongle to your computer. If you don't know the number it does no harm just to try all the options. The board communicates at 57600 baud, and you need to make sure that the Arduino serial monitor is set to this, which is done using the drop-down box in the serial monitor window.
When you power up the board it should print a welcome message and some startup information to the serial monitor. From here you can issue the following commands:
- i : print information about the logged data.
- p : print out the logged data.
- e : erase the log memory.
- t : run a diagnostic self-test routine (note, this erases the log memory).
- g : start logging (note, the board will always start logging automatically after reset).
- c : stop logging.
There are a few other commands available that are mainly useful for debugging. Take a look at the firmware source code if you're interested.
You can download the log data with the serial console, but it is a bit of a pain. You need to connect to the board through the serial monitor and issue a 'p' commmand to print the data out. This takes ages. Then you need to copy and paste the data into a text file and plot it up in the program of your choice. This is made more painful by the fact that, at least on my computer, it isn't possible to do a "select all" in the serial monitor window. You can find the formula to convert pressure to altitude in the BMP085 datasheet.